Thursday, May 24, 2012

Baby Shower Baking

One of my closest friends is having a baby and I could not be more excited.  Not only am I thrilled to share the joys and challenges of motherhood with her, I was also stoked to bake delicious treats for her baby shower.  The theme was Cinco de Mayo because it was held on May 5th... but also, what makes a baby shower more festive than slushy momgaritas?  So I figured, what better treat than margarita cupcakes?!  I did some searching and found a recipe that seemed simple... which I really needed since I was making not only margarita cupcakes, but also mexican chocolate cupcakes and cheesecake truffle pops.  Yup, I go all out.  For her, I'd do anything.

So let's start with the margarita cupcakes, I used a recipe from my tried and true iambaker site.  I used vanilla cake instead of lemon and I omitted the tequila, though I'm sure this would have made them really taste 'margarita'esque... I figured I didn't want to push any buttons at a baby shower.

You need:

1 box lemon cake (I used vanilla and added 1/4 lemon juice and the zest of one lemon)
4 eggs
1/2 cup oil
1/2 water
(She suggests using these wet ingredients and not the directions on the box, which I did and they were great!)

What you need to do:

Mix all of the ingredients together in a mixer.  Fill cupcakes liners 3/4 way full and bake for about 18 minutes at 350 degrees.

I wanted these cupcakes to stay fresh and delicious, and because I made these the day before the shower, I made a quick key lime simple syrup to brush on the tops of each cupcake.  I then frosted them with a lime buttercream.  Yum!

To make the lime buttercream, make your basic buttercream (1 cup butter, 5-6 cups icing sugar, 3-6 tbsp milk) but cut back on the milk and add lime juice and lime zest.  Also, a tablespoon of tequila would go a long way to making these true margarita cupcakes.

Photo courtesy of iambaker
I also made chocolate cupcakes with a blackberry compote and lilac buttercream.  And cheesecake truffle 'pops'.  I didn't quite expect the cheesecake pops to be such a hit, but they ended up being deeeelicious!  The best part was: they are dead simple to make.  But those are for the next post ;)

Wednesday, May 16, 2012

DIY Art

Our living room wall is covered in this fabulous black textured wallpaper and it's just dying for a beautiful piece of art.  Tim and I had been wanting to get something great but just haven't been able to find the right  canvas.  The search is still on, but in the meantime, I figured I'd try my hand at a super easy DIY craft.

I love www.curbly.com for crafty DIY inspiration.  They have makeovers, arts and crafts, even "Foodie Fridays" and they're designs couldn't be easier.  I saw a neat art project that I thought would be great for our wall; it didn't quite turn out they way I wanted but it's perfect in our office.  Curbly led me to another easy DIY art project with how-to's and recommendations here and here.  They made it look so darn easy, that I bought a couple canvas and had at 'er.  This one, I was impressed with.  This one went up on the wall.

I taped off the two canvas in a pattern that flowed together but would be hung apart.
I made the mistake of using tape that was intended for florists' use and resembled duct tape.  Unfortunately it wasn't the best decision I made, but I guess I know better for next time.  As you can see, some of the lines weren't entirely crisp when I pulled with tape off but I just touched them up with white acrylic.

A secret to this project was, I didn't use acrylic paint for the entire canvas.  Instead, I used three different colors that would tie things together with the purple lamps and foot stools in our living room.  Our other walls are grey, so I used some of that remaining paint.  Then, because I love Lowe's, I picked up a few free samples of Valspar paint in varying tones of purple.

The finished product isn't perfect, but considering it didn't cost much and I had fun doing it... I'm pretty happy with the result.  Plus, now I know what to do for the next time!

I think it would be fun to mimic the pattern of the couch and tape off softer lines next time.  It's as easy as painting over the canvas and giving it another go.  But first, a canvas for Gracie's room!


Tuesday, May 15, 2012

Impromptu Upcycling

So I've always known that I have a bit of an addictive personality, but I never thought I'd be quite so impulsive.  Or obsessive compulsive if you ask my husband.  Tomato Tomawto.  When Tim and I returned from living overseas, we didn't exactly have a tonne of furniture as we hadn't kept anything when we left Canada.  We were starting from scratch and welcomed any help we could get in setting up our home.  Luckily, we inherited a couch and chair from his parents that exhibits, to this day, incredible construction and comfort.  They are, however, covered in an absolutely hideous pattern.  Stylish for the time they were purchased many moons ago, I am sure, but definitely in need of some updating.  In our efforts to make the best of a good inheritance, we bought a couch cover and threw a large and lusciously soft blanket over the chair.  I think you can see where this is going....

I woke up one morning... or rather it was likely more I couldn't get back to sleep after Gracie's early morning feed, but that's just a minor and unimportant detail.  I woke up one morning and was overwhelmed with, let's call it a 'desire', to try my hand at recovering the chair.  Something had to be done.  I hated the shuffling around of the blanket and cover, the bunching and pulling, the crumb-catching and general blech.  It had to go.

But I didn't exactly want to fork out the dough for a new couch.  Not when we have a baby that will barf, slobber, and grope at it.  And then a toddler that will sticky-finger-"mommy-look-I'm-jumping-on-the-couch!".  And then a teenager that would wipe god knows what on it.  No.  No, I'd rather save my money and buy a truly fabulous couch later.  For now, I'm jumping on the upcycling bandwagon (which I'm a true believer in by the way), take what I have and repurpose, recover, renew it to make it wonderful again.

So I moseyed, yes moseyed, on over to the fabric store, picked out an upholstery fabric that I figured I wouldn't hate in mere months and collected some supplies.  And then I got to work.  Of course I googled the crap out of 'chair reupholstery' and every variation I could think of... you'd bet there would be all sorts of tutorials and recommendations, but no.  There is, in my opinion, a shameful lack of information available.  And, the ones that are out there involve the cumbersome and daunting task of cutting off the existing fabric, laying it out to make a pattern, and then sewing a new cover for your furniture.  Well... since I couldn't (at that time) sew a stitch if my life depended on it and I wasn't about to let this get in my way, I took a stab at it my way.

Fabric was purchased on discount at Fabricland: $8.99/m.  Total cost, including staple gun, $150.
I knew that with a little artful folding, some liquid stitch, and a trusty staple gun... I could get the job done.  Yes, you read it right, there isn't a single stitch in that recovered chair.  With a 4 month old daughter, it took me a few days to get it done... but I was very impressed once I was finished.  Even Tim loved it, so much so that he asked me to do the couch too.  Sure honey!  Whatever you want :)

This fabulous fabric is from IKEA, $5.99/m.  Total cost: $104.
Gracie, at 6 months, was napping morning and afternoon so I was able to get this project done in a little more than a week.  The cushions are the trickiest part, one a day.  But the bottom, back, and sides were completed in two days.  Not too shabby!


I also decided to recover our stools and paint a canvas for the wall... but that's for the next blog.

So if you have an old couch, or coffee table, or dresser, or heck anything that's old... don't throw it away.  Find a little inspiration and a pinch of 'what-the-hell' and make it new again.  Upcycling is very chic these days :)

Wednesday, May 2, 2012

Let Them Eat Cake

It's no surprise that I love to bake.  I would be lying if I said I haven't whipped together a batch of my delicious chocolate chip cookies late at night following a nice meal.  Cake is a personal love of mine; there's nothing quite like pushing your fork through a soft, springy piece of rich, luscious cake.  I especially love those slices that whisper moist little secrets in your ear.  Which is why I fell absolutely in love with this Devil's Food Chocolate Cake I made for Tim's aunt.

I have, for several family occasions, made cupcakes.  Cupcakes are easy to serve, easy to eat, easy to bake.  They do, however, lack a certain 'je ne sais quoi' when it comes to awesomeness.  A double layer cake on the other hand is nearly the perfect dessert.  It's right up there with lemon tarts or molten chocolate cakes... but those are separate blog posts.  I digress.

Also, I should confess that I didn't create this cake recipe.  Oh heavens no.  I am, after all, just your average momma making a yummy home, not a recipe maven.  I picked it up at a Williams Sonoma Technique Class (which are, by the way, free if you're ever looking for something fun to do for an hour on a Sunday morning!).  It's easy and so, so, so very delicious.

Devil's Food Chocolate Cake with Chocolate Buttercream and Blackberries
For the cake, you need:

1 cup boiling water
3/4 cup unsweetened cocoa powder
1 3/4 cups all-purpose flour
1 1/2 teaspoon baking soda
1/4 teaspoon salt
2 cups granulated sugar (I used brown sugar and liked the variation)
10 tablespoons (1 1/4 sticks) butter, at room temperature (*8 tablespoons is 1/2 cup)
3 eggs
1 teaspoon vanilla extract
1 1/4 cups buttermilk
*I rarely use actual buttermilk, instead I use: 1 1/4 cups whole milk mixed with 1 tablespoon of vinegar and let rest for 5 minutes.

What you need to do:

To make the cake, preheat oven to 350°F.   The recipe recommends to lightly butter two 9-inch round cake pans and dust with flour, but I used a parchment circle on the bottom of my non-stick Baker's Secret pans and had great results... so I guess, do what you're comfortable with.

In a small heatproof bowl or measuring cup, whisk together the boiling water and cocoa powder until smooth.  Let cool completely.

In a bowl, sift together dry ingredients and set aside.

In your fabulous mixer, beat together the sugar and butter until the mixture is light in color and texture, about 3 minutes.  Beat in the eggs, one at a time, then beat in the vanilla and the cooled cocoa mixture.  When I made cakes in the past, I never followed these instructions.  I always just creamed the butter and threw everything in at once.  Don't do this.  Take the extra couple of minutes and allow the butter and sugar to come together into a creamy cloud of awesome and then incorporate the eggs, one at a time.  It really does make a difference.  Trust me.

Then, reduce the speed to low and add the flour mixture, alternating with the buttermilk (beginning and ending with the flour mixture).  Beat until smooth, stopping to scrape the sides occasionally.  Divide the batter evenly into pans and bake for approximately 35-40 minutes or until they bounce back to the touch.  Transfer to wire racks to cool for 15 minutes.  Run a knife around the sides of each pans to release the cakes.  Invert the pans onto the racks and let cool completely.

Variation: if you're set on cupcakes, the recipe makes 24.  Bake for 20-25 minutes.


For the chocolate buttercream, you need:

8 oz. unsweetened chocolate, chopped 
6 cups confectioners' sugar (icing sugar)
1 cup unsalted butter
6 tablespoons milk, plus more if needed
2 teaspoons vanilla extract
1/4 teaspoon salt

What you need to do: 

Have all the ingredients at room temperature.  Put the chocolate in the top pan of a double boiler, or if you're like me: an Anchor Hocking glass bowl over a pot of simmering water (easy peasy!).  Ensure the bowl isn't touching the hot water.  Stir until the chocolate is melted and smooth.  Let cool to room temperature.

In the bowl of your fabulous mixer (again) fitted with the flat beater, cream the butter with the vanilla and salt.  Slowly combine the confectioners' sugar and the milk.  I find repeating the cycle of adding one cup icing sugar and 1 tablespoon of milk achieves the best results.  Plus, you're less likely to be covered in icing sugar and have one hell of a mess to clean up later.  Beat on low speed until combined.  Stop the mixer and scrape down the sides of the bowl.  Increase the speed to medium and beat for 2 minutes, then reduce to low and slowly add the chocolate until combined.  Increase speed again to medium and beat for 1 minute more.  I find the measurements of this recipe spot on, but if the frosting is dry, add more milk, 1 teaspoon at a time, until it is creamy but still holds peaks.  Makes about 4 1/2 cups of buttercream.

Putting it all together:

Place 1 cake layer, bottom side up, on a cake plate.  Using an offset icing spatula, spread the top of the layer with a generous 1/2 cup of the buttercream.  Or, well let's face it, however much you want.  If you prefer a thin layer, cut back on the recommended 1/2 cup.  If you're like me, you go big or go home... so knock yourself out :)

I had blackberries in the fridge that I didn't want to go to waster so I quickly 'macerated' the berries with a scant spoonful of icing sugar and stirred them up.  This will make them juicy and soft.  I added a layer of berries before placing the second layer on top.  Place the second layer, top side down, on top of the first layer.  Frost the top and sides with the remaining buttercream.
     
Note the parchment sleeves... tuck these under the edge of your cake so you can gently tug them out after frosting and you'll have a clean plate or cake stand.


Place the second layer, top side down, on top of the first layer.  Frost the top and sides with the remaining buttercream.

To clean up the sides, I 'pulled' the buttercream up, bottom to top, all the way around.

I took a page from the iambaker tutorials (http://iambaker.net/rose-cake-tutorial) and finished the top with the roses, as seen below.

And before you start to think that you can't do this, you totally can.  It's as easy as fitting your piping bag with a run-of-the-mill star tip, then slowly move your tip in a circle around the centre point.  Try to end in the same place each time.

Since the flowers big, you're bound to have some 'dead' space. Just go in and make a swoop with your tip in the same direction as the rose right next to it.  You can hardly tell where the fill ins are.


Not too shabby eh?!

Place in the fridge for at least 30 minutes to allow the buttercream to firm up.

Now, all you need to do is show up at that dinner party or birthday bash or baby shower or fill-in-the-blank and you'll be the talk of the town.  Truly, it's that easy.

Would I lead you astray?  When it comes to cake... NEVER!

So, go.  Bake a cake.  Be merry.  That is my command ;)


Friday, April 27, 2012

Fabulous Homemade Bread

I don't necessarily consider myself one of those strictly natural kind of gals.  I do, however, take the time to read the list of ingredients on items I put in my grocery cart.  What is "acetylated tartaric acid esters of mono and diglycerides" anyways?  And I've heard on more than one occasion: "you don't even want to know what a 'modified milk ingredient' is".  It's a little scary once you start really looking at what's in your food.  Especially since there was once a day that we made our food from scratch, we bought what was in season, and we were just fine without preservatives and prolonged 'freshness'.

Of course, I believe science and technology have allowed humankind to make great advances.  Food included.  I guess I'm just not fully convinced that my food has to have a list of ingredients as long as my arm and full of words I can't pronounce to be healthy or delicious.

I also believe that there's something to be said about a fresh loaf of bread.  Being at home with Grace has afforded me the opportunity to do things that I may not have done while working full-time.  Baking bread is one of those things.  I tried my hand at a few different recipes and wasn't exactly impressed with the mediocre, bland-tasting loafs they produced.  Then, I found a stellar concoction that I tweaked (of course, I do nothing 'by the book') and making bread weekly fast became a delicious habit.  Some people I talk to couldn't fathom baking their own bread either due to the time it takes, working with yeast, or not getting the results they want.  This recipe, however, will make you want to change your tune.

You need: 

1/4 cup warm water
1 1/2 packages of active dry yeast (*1 package of yeast is 2 1/4 teaspoons)
2 tablespoons bread flour
1 tablespoon brown sugar
~~~~~~~~~~~~~~~~~~~~~~~~~~~~~~~~~~~~~~~~~~~~~~~~~~~~
1 cup oats
1 cup flour
2 1/4 cups warm water
3/4 tablespoon salt
1 tablespoon honey
1/3 cup brown sugar
1/3 cup oil (I prefer olive oil)
2.5-3 cups multigrain flour
2.5-3 cups bread flour
*a quick note on flour: I use a combination of Robin Hood Nutri Blend Flour and Best for Bread Blend, Multigrain

<strong>Robin Hood®</strong> Best For Bread Multigrain Blend - Product<strong>Robin Hood® Nutri™ </strong>Flour Blend - Product   

What you need to do: 

Stir the first four ingredients together in a warm mixing bowl.  Let sit for 5 minutes allowing yeast to activate.  Then add all remaining ingredients except the 5-6 cups of flour.  Mix for 2 minutes in your mixer fitted with the dough hook.  (You can, of course, do this by hand, but having the mixer cuts your physical investment in this bread down to a super-crazy-minimum).  Gradually add the flour until dough pulls away from the sides of the bowl; dough will be a bit sticky.  Place dough in oiled bowl and let rise in a warm place free of drafts.  I often let is rise uncovered in the oven with a bowl of boiled water.  


Let rise until double in size, or about one hour.  

Divide dough into 3 pieces and roll out to form into loaves.  Place in greased pan and let rise again.

This recipe makes 3 loaves but as my husband loves little else more than cinnamon buns, I devote some of the dough to those (as pictured).  

Bake at 375 degrees for 25 minutes.

A cinnamon loaf just so happens to be perfect for Sunday morning brunch; cinnamon 'bun' french toast anyone?

Seriously though, this bread is so very, very simple.  The 'hardest' part of baking bread is the rise time.  For the first time today, I used a bread machine.  Did I feel that it took away from the process?  No, not at all.  In fact, fresh bread has never been so easy.  So am I against them?  Absolutely not!  But do you need one?  Oh momma, no :)

Thursday, April 26, 2012

Let's End this Damn Hiatus

It's been almost a year to the day since my last post and that's just bullsh*t no?  My bad.

During my 372 day hiatus, I have been blessed with a beautiful baby girl, Grace Emily Rose who is now a whopping six months old.  Where does the time go?  Sure, being a new mom is tiring, consuming, frustrating, and truly wonderful.


But is that much of an excuse not to be sharing all the fabulous new recipes I've been trying?  No.  No, it isn't.  For shame.  My deepest apologies.

Now on to the exciting new things I've been doing.  Maternity leave has left me with a great deal of time to try new recipes, scour the never-ending DIY and crafty tutorials, and try my hand at, well, pretty much anything.  I've started baking my own bread because it just plain tastes better.  So does handmade pasta if you were wondering.  I woke up one morning and decided I just had enough of that ugly, old chair so I recovered it.  Gracie needed some art for her room so I painted her a canvas.  I thought it would be a good idea to teach myself to sew.  And I just inherited a very impressive collection of knitting needles and crochet hooks.  If you didn't know better, you might think I was becoming one of those meth-mommies.  But no.  No, I have the time to be creative and I'm not going to let that go to waste!

So where should I begin?  Let's start with pasta.

Who doesn't love soft, luscious, silky noodles?  You don't find an ooey, gooey bowl of mac n' cheese comforting?  Liar.  Everyone enjoys a delicious plate of ravioli.  Now imagine all of those... but better.  Fresh pasta will, quite literally, revolutionize your life.  My fabulous husband, Tim, did his research and gave me the Imperia Pasta Maker (apparently the "Rolls Royce of pasta machines") for Christmas.  I have heard, and believe, that the KitchenAid pasta attachment is pretty swell.  But there's something romantic about kneading the dough, rolling it through the machine by hand, and hanging them to dry.  Even with a two month old daughter, it's worth making the time to whip some pasta together.  Yes, I said whip it together.  It really doesn't take that long.

You need:
2 cups of flour (preferably "00" flour, but I'd be lying if I said I didn't use all-purpouse flour and cake flour quite successfully)
3 eggs

What you need to do:

Pour flour onto a flat surface and make a well in the middle.  Crack your eggs into the well and whisk gently to incorporate the flour.  

My tried and true recipe is from Jamie's Italy cookbook.

Let your pasta rest for half an hour in the fridge.  Then, roll away.
Imperia offers great and simple rolling instructions.
We hung these pasta sheets as we were figuring out how to cut noodles.  As we've made our fair share of fresh pasta, we realize this isn't such a good idea since the rack really gets its job done and dries the pasta out quite quickly.  I recommend rolling the sheets flat, cutting them into your desired shape, and then hanging them to dry.


The final preparations are stupid easy.  If you can boil water, you can make pasta.  Make sure to liberally salt your water and reserve some pasta water to loosen your favorite sauce.  The noodles cook in mere minutes.  And I mean like 2-3 minutes, not 8-12 minutes.  Smother in a yummy sauce and enjoy!

Fresh tagliatelle carbonara... mmmmm bliss in a bowl

Tomorrow, I shall share my adventures in bread baking.  I promise.

Monday, April 18, 2011

Brunch Muffins

First, an apology for not blogging more about fabulous food and wine.  I have, with all of my heart, wanted to be experimenting with new recipes and sharing them with you.  I have, unfortunately, not had any desire to be in the kitchen (this is a real first for me!), due to this crazy fatigue I've been enduring all for the love of our little baby.  I've spent what energy I have been able to muster up in this first trimester wishing I had even the remotest appetite to throw something together.  My poor husband.  Alas, the second trimester is upon us and I do believe (read: hope) that I will find some inspiration that will pull me back to the stove.

And speaking of inspiration, I recently received a number of cookbooks in the mail, one in particular that I'm pretty sure I actually squealed with delight when I opened over my Sunday toast: Jamie At Home.  It is just what I've been trying to get my greasy little fingers on.  It is the perfect combination of recipes and advice (gardening to be precise) and will serve my newfound ambition to cultivate a more 'field-to-plate' habit in our household.  Of course, my tiny little garden plot out back has been sitting bare for a whopping 7 months as we have had quite the winter and I don't dare plant anything.  So I've been patiently waiting while our snowy April (yes, April) progresses, reading Jamie's recommendations of what to plant where, and how to pluck the veggie morsels from your toiled-with-love soil and whip them up into something delicious.

But before I get ahead of myself... this is supposed to be about brunch muffins.  And so it shall be.

I love brunch.  I love breakfast really anytime of the day.  In fact, I think breakfast for dinner has to be my favorite.  So, when is stumbled on the simple recipe for blueberry sour-cream muffins, I was a very happy woman!


They're dead simple to make, incredibly moist, and just what you need as you pad around in your bare feet, sipping a latte.

I suppose you could forego the crumbly crunchy sugary topping... but where's the fun in that?!

So go head, treat yourself to a yummy Sunday muffin :)

INGREDIENTS

TOPPING

  1. 1/2 cup light brown sugar
  2. 1/3 cup all-purpose flour
  3. 2 tablespoons unsalted butter, softened
  4. 1 teaspoon cinnamon

MUFFINS

  1. 1 1/2 cups plus 1 tablespoon all-purpose flour
  2. 2 teaspoons baking powder
  3. 1/4 teaspoon baking soda
  4. 1/2 teaspoon salt
  5. 1 large egg
  6. 3/4 cup sugar
  7. 1 tablespoon unsalted butter, melted
  8. 1 rounded cup sour cream
  9. 1 teaspoon pure vanilla extract
  10. 3/4 teaspoon finely grated lemon zest
  11. 1 rounded cup frozen blueberries


DIRECTIONS

  1. MAKE THE TOPPING: Preheat the oven to 375°. In a medium bowl, combine the brown sugar, flour, butter and cinnamon. Rub with your fingers to form coarse crumbs. Refrigerate until ready to use.
  2. MAKE THE MUFFINS: Butter a 12-cup muffin pan. In a medium bowl, whisk the 1 1/2 cups of flour with the baking powder, baking soda and salt. In a large bowl, using a handheld mixer, beat the egg at medium speed until frothy. Add the sugar and melted butter and beat until pale yellow, 1 minute. Beat in the sour cream, vanilla and lemon zest until blended. Add the dry ingredients and beat at low speed until almost blended. In a bowl, toss the blueberries with the remaining 1 tablespoon of flour. Using a rubber spatula, fold the blueberries into the batter.
  3. Fill the muffin cups three-fourths full of batter and sprinkle with the topping. Bake for 25 minutes, or until a cake tester inserted in the center of a muffin comes out clean. Remove the muffins from the pan and let cool on a rack.

MAKE AHEAD

The muffins can be stored in an airtight container for up to 3 days.

Tuesday, March 29, 2011

Quick Dinners

So I've been absent again for a number of reasons, most importantly that I just haven't had the inspiration to whip up something worthy of a blog post.  Looking back at the last, I realize that there were a number of things like the Velvety Beet Cupcakes and the "Best Pancakes" recipe that, I have decided, is so overrated.

I have however found a quick dinner recipe that I was able to throw together in a matter of 20 minutes and it was oh-so-tasty!

I had been craving spaghetti all putanesca and we had cod in the fridge.  So I went to my trusty epicurious iPhone app to see just what I could combine to satisfy my tastebuds and use what I had in my fridge.

Salt Cod with Tomatoes and Capers:  Epicurious Baccalà alla Vesuviana sparked a thought that I could probably make our tummies and pockets happy.

So I swiftly chopped and combined garlic, onions, anchovies, capers, olives, and hot pepper together and slipped in the cod to simmer while the spaghettini boiled.

Resting the cod on a bed of the fresh spaghettini and covering with the delicious sauce... delightful!

Do not think, for one second, that you can't whip up something amazing in 20 minutes.  It just takes a bit of inspiration (alla epicurious, cookbook, or favorite recipe card) and a love for something yum!

So, go ahead, enjoy a fabulous Tuesday evening dinner!

Monday, February 21, 2011

No Excuses

There is absolutely no plausible cover story I can conjure up that could rationalize my absence from my beloved blog.  Being busy at work and life will not exonerate me from my lack of commitment to sharing good food with friends.  My absence in this forum does not at all mean that I haven't been enjoying dinners with friends, experimenting with new recipes, or just plain forcing something new on my unsuspecting husband.  I should have simply been more diligent in sharing it with you.  My bad.

I should have blogged about my husband's 30th birthday feast.  It was a feast, indeed.  I should have shared my experimentation with the Velvety Beet Cupcakes with Raspberry Icing.  And I should have at least made a small blip on the Sous Vide lamb shanks we had for dinner the other night which were so good, they warranted making it a regular menu item in our household.  It seems I do have a great deal to blog about, particularly the "Best Buttermilk Pancakes" recipe which I have tried a few times and have determined it ought to seriously rethink it's boastful name.

But for now, I will, for the sake of keeping this short and sweet, only choose one of the above....  The Birthday Dinner it is.

I had, for a long while, been wanting to plan a wonderful 30th birthday bash for my dear husband, but all surprises I had meticulously planned fell through for one reason or another.  So I abandoned all hope and decided to do what I do best.  Cook.  Well, shop and then cook.  I hit up a number of different shops around town to make the perfect evening.  And I even ordered fresh, organic, game meat from a local ranch.  Canadian Rocky Mountain Ranch, CRMR Home, Mercato, Bin 905, and Janice Beaton Cheeses set the stage for what would be a night of fine dining in the comfort of our little home.


We began with some finely selected cheeses: Brillat Savarin with truffles, Chimay, Bleu de Basque, an Appenzeller-style cheese which I now forget the name, and a ash-rind goat cheese that was a little puck of yum... all with fresh figs.

We enjoyed some game salami; elk salami and smoked buffalo.  And fresh authentic bruschetta.

Accompanied by a perfect bottle of bubbly, our evening was off to a good start.


The evening was going so well, we could have stopped there, but that wouldn't have been 'all-out' now would it?

What could I possible do to make this evening better?

Well.................


Beautiful green leeks simmered down to a creamy, melt-in-your-mouth pot of bliss with bacon, smashed soft baby potatoes topped with a mushroom demi-glaze, and a perfectly cooked elk sirloin plucked from the Sous Vide Supreme was just what the night needed.

Dinner was divine.

Unfortunately, my husband had a prior evening engagement that he could not miss, and so our dinner was coming to a close.

Though it wouldn't be much of a birthday if I didn't at least give him a little gift, no?
Nothing a little Eagle Rare Single Barrel Kentucky Bourbon won't fix ;)

And while he was gone, I took it upon myself to tie up the night in a pretty little birthday cake bow.  He requested a Black Forest Cake, which I, admittedly, have never been a big fan of but was determined to give him what he wanted.  It was his 30th after all.  So I whipped up the tried and true Nigella Lawson Molten Chocolate Babycakes and made a sour cherry compote as the 'black forest' topping.  With a dollop of vanilla bean ice cream, he'd be as gooey as the chocolately lava-filled cakes.  Mmmm ;) 


All in all, there is little about the evening that wasn't perfect.

And he was in heaven.  

Just where you wanna be when you feel you're over the hill.........

......... on a cloud of culinary bliss with your loved one.

Sunday, January 9, 2011

Call Me Donkey

I have a guilty pleasure.  I know, I say it like I have just one *pfft*, but I'm open about this one.  It's a pleasure I do not deny myself and I won't hide it.  I'm not ashamed of it.  I heart Gordon Ramsey.  I have a friend who despises him, for what reason I do not know, but I suppose it's fair.  He's not everyone's cup of tea.  He is, for me, one of two chefs that I adore purely for their unabated love for taking simple, fresh ingredients and turning them into masterpieces.  Since returning home to Canada, I have taken my kitchen by storm; whirling around trying any new recipe I can get my hands on, however simple or challenging.  I believe this has taught me to take a second look at what we're putting in our mouths and make sure it counts.  I want it to be healthy.  And I want it to be good.  Damn good.

And so, in my foodie blog surfing, cookbook page flipping, and chef-driven boob-tube addiction (I don't remember that last time I watched something on television that wasn't related to food, unless my husband has the remote, and then there's usually a ball and a ref involved), I have found a few dishes here and there that piqued my interest.

Gordon Ramsey's Beef Wellington has been one of them.  I've seen him make it a thousand times on Hell's Kitchen.  And I've loved watching him call the innocent, doe-eyed dude a donkey when it comes out wrong.  It can't be that hard, can it?  Then, I got Ramsey's iPhone app.  Lo and behold, the Wellington was an item, with video thank you my dear chef Ramsey, that you could take a crack at if you had the balls to attempt the 'expertise' level recipe.  It was with great excitement and slight trepidation that I made up my mind to master this Wellington.  I would not be called a fat cow by the man.

And so it began.  I followed all of his tips.  Watched all of his techniques.  And had a good go at it.  

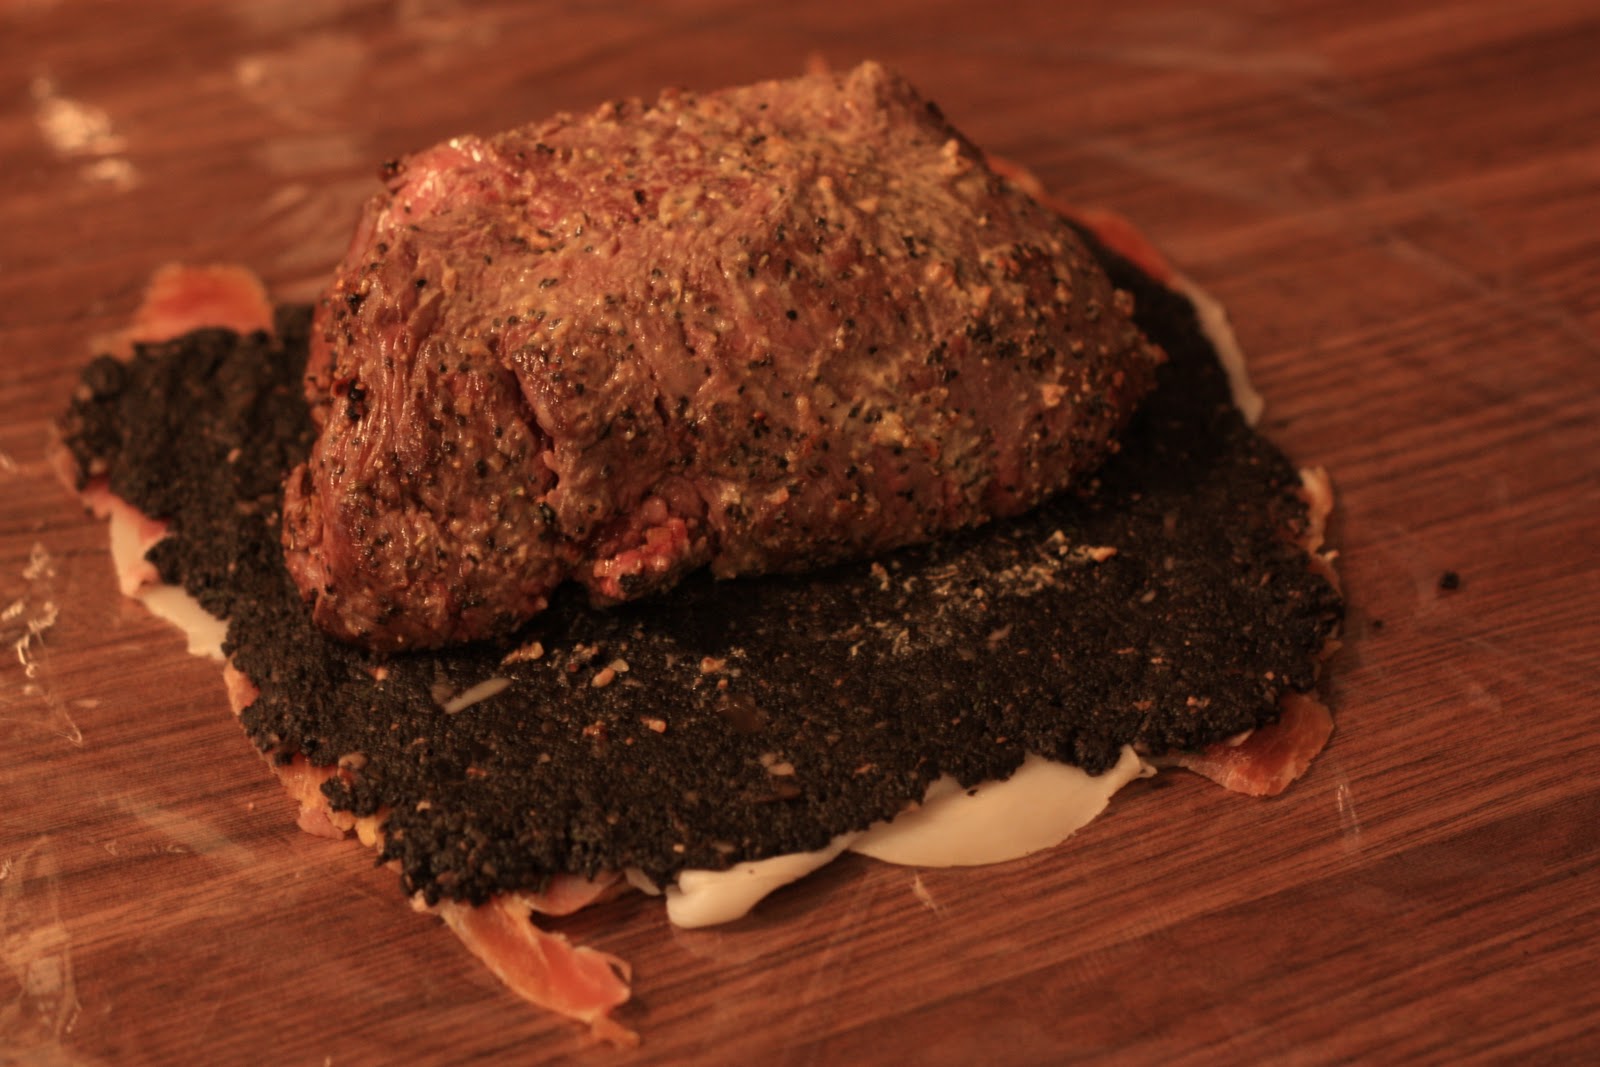
Ramsey calls for the sirloin to be wrapped in mushrooms and proscuitto.  Check.


Sirloin seared and resting.  Water sauteed out of the mushrooms and cooled.  Proscuitto on the plastic wrap, mushrooms down, sirloin ready.  What is all of the hullabaloo about?  

And wrapped!  Now for the puff pastry.
Now I suppose I was feeling a little confident at this point, how could I not?  It was lookin' good.  Ramsey called for the puff pastry to be rolled out to the thickness of a £1 coin, which lets face it, I don't really know how thick that is.  Is that like a Loonie?  A Twoonie?  Maybe a quarter?  Eff.  Let's just wing it... that's what I do, right?  Pastry rolled, sirloin wrapped, wellington egg-washed, and into the oven it went.
I have to confess that I although I wasn't feeling totally cocksure about my Wellington, I was, let's say, feeling upbeat.  I had done it (so far) without any major hiccups and was happy I could deliver a good result.  After 35 minutes in 350ºF, I popped it out, and let it rest like a good girl should.

Not to shabby right?  

As I sliced into the, what looked to be pretty perfect Wellington, I was feeling hopeful.  Could I really have done it on my first try?

It turns out, the hardest part of the damn dish was cutting it with the precision of a ninja on a dark starry night.  

The puff pastry flaked away, shifted, was a mangled mess.  It looked as if I had maimed it with a kid's beach toy instead of my new, fancy knives.  Looking at the puffy, meaty mess, I felt injured.  It happened.  I had failed.  It tasted delicious but looked like a pile of discombobulated meaty delicacy.  Had Ramsey been in my kitchen, he would have called me a stupid donkey and thrown a fork at me.  I would have deserved it.

I have resolved to try it again.  I was convinced, by the sheer taste alone, that I could do better.  I had to.  And I think I even know what my nemesis was: £1 coin puff pastry.

Anyone have a £1?  Wellington, you will not defeat me.

Wednesday, January 5, 2011

'Tis the Season to Eat Leftovers

As we all step boldly into the New Year with fresh resolutions and hearts floating on the fluffy, thick high that comes from the thought of new beginnings, most of us are also pondering what we just don't need anymore.  Let's call it a little more reflection.  Say, that bad habit you've been meaning to crack, or that daily extra-hot-quad-shot-skinny-minny-upside-down-inside-out-round-and-round-*gasp*-venti-extra-whip-caramel-macchiato, or heck, why not that miniature hippopotamus that surreptitiously crawled under your belly when you were preoccupied with sugarplums dancing in your head.

Or it may just be that leftover turkey lounging in the back of your fridge that you've be gazing at, wondering how you could possibly eat more turkey.  Boy howdy, do I have the solution for you!
 
Turkey and Leek Pie 
 
Inspired by Jamie Oliver during the standard New Year's Day recuperation period, it's as yummy as it sounds.  And simple to boot!  With all of 6 ingredients (sans seasoning of course), it not only used up our leftover turkey, it turned it into something I would consider making turkey in the middle of June... just for this pie. 


With a quick throw-together of onion, garlic, bacon, leeks, turkey, and stock... the savory, gooey mess topped with flaky puff pastry, was deeeelish!  Ok, so maybe puff pastry doesn't fall into the 'healthy beginnings' that often accompany blossoming resolutions, but it was worth the extra exercise.  And well, if you're hell bent on bein' good... you could substitute the puff for mash or leave it off altogether, but it wouldn't really be a pie then would it?

I can't say I really measured anything as I made this recipe.  I sort of just grabbed the leftovers and made them by bitch.  So start by preheating your oven to 375°F.  Snip half a package of bacon into a large pot on a medium heat.  Drain most of the grease off before adding approximately 3 or 4, depending on their size and how much turkey you have, prepped leeks (washed, trimmed; white end chopped into chunks, green end finely chopped) and some chopped onion and garlic to the pot.  Add a lug of olive oil and the butter and let it all fry off a few minutes so they're well coated in the butter.  Add a pinch of salt and pepper then pop the lid on top, turn the heat down to medium and let them cook away gently for 30 minutes, stirring every 5 to 10 minutes to make sure they don’t catch.  There’s going to be enough moisture in the leeks to keep them happy in the pan so they should be soft and melt in your mouth once they’re done.

When your leeks are ready, add the turkey meat to them and stir.  Add the flour, mix it in well then pour in your stock (I added about 3 cups, but base it on how much turkey you have and how much slurpy yum you want) and stir again. Add a couple big spoonfuls of crème fraîche or sour cream, then turn the heat up and bring everything back up to the boil. Have a taste and add a bit more salt and pepper if it needs it then turn the heat off. Spoon the thick leek and turkey mixture with that wonderful gravy into a pie plate or casserole dish.

Dust a clean surface, roll out your pastry so it's about double the size of your dish.  Sprinkle with fresh thyme and rosemary, fold over and roll out carefully so you have the right size for your dish.  Don’t worry if a few bits stick out here and there.  Lay your pastry on top, tuck the ends under then gently score the pastry diagonally with your knife.  Add a pinch of salt to your beaten egg then paint this egg wash over the top of your pastry.  Pop your pie in the oven for about 35 to 40 minutes or until the pastry is puffed up and golden brown.

Gather some friends, grab a glass of wine... I might reach for an Alsatian Gewurztraminer... and enjoy! 

Monday, January 3, 2011

My Life Under Vacuum

As self-admitted in previous blogs, I have a bit of an addictive personality.  And if you know me at all, you know that I am completely addicted to food.  Cooking, eating, baking, sharing... if it involves food, I'm in.  

I have, in my many hours of watching the Food Network, seen numerous different chefs (professional and aspiring) use the sous vide method in the effort to produce impeccable and delectable results.  I was intrigued to say the least.  So, when I received the tremendous gift of a sous vide machine, I was first shocked that I, a humble home cook with no 'formal training', had before me a machine that most people have never even heard of and was secondly, quite excited to start experimenting.  

If you fall into the category of wondering what the heck a sous vide machine is, you are not alone.  Sous vide, French for "under vacuum", is a method of cooking food sealed in airtight plastic bags in a water bath.  Often for extended periods of time, like the leg of lamb I am currently sous vide-ing for my mother's birthday, a mere 48 hours, at an accurately determined temperature much lower than normally used.  The aforementioned leg of lamb is chillin' out at 62°C.  The intention behind this method of cooking is to maintain the integrity and nutrition of ingredients.  The perk is that we have enjoyed succulent cuts of meat of all kinds that are, in our opinion, restaurant quality at a much more affordable price.  

So, as said, my addiction has caused me to sous vide pretty much anything I can get my hands on.  My first attempt was a couple of baseball cut sirloins with a dash of spice and a bit of garlic and ginger.
Vacuum packed steaks, ready for the sous vide machine.


I slipped them into the machine at 56°C, the scientifically determined temperature for medium-rare meats, for a couple hours until my husband returned from his basketball practice.  The beauty of the machine is that it never goes above your selected temperature, so even though my husband was running late, our steaks were not overcooked, dried out, or resembling something like a hockey puck.
  
No, instead I eased the tender steaks from the bag to flash sear them before serving, let them rest, and sliced into the perfectly medium-rare steak like it was a slab of soft butta.  
My husband likes this picture because it "fully encapsulates the sexiness that this steak was."  'Nough said.

And we can cook more than just a perfect steak; medium-rare from edge to edge and succulent as could be.  You can do stews, curries, vegetables, fruits, even a chocolate ganache.  It saves you money since you can purchase cheaper cuts of meat as the machine tenderizes as it cooks and there are no lost nutrients as when you boil or steam items.  For all of the perks, check this out: 


I picked up a discounted lamb rack during the holidays; I was tired and had little patience to make a big fancy dinner.  Instead, I just threw some spices on the lamb, chucked it into a vac-pac, slipped it into the machine, and walked away to complete other holiday tasks.  4 hours later, we were enjoying the most tender and flavorful lamb I have ever had.
I have since made a pork roast, a leg of lamb, baby back ribs, and all kinds of awesome.  And I came home yesterday with the Sunday grocery run full of meats to try in the sous vide machine.  A curried pork roast, a couple lemon garlic cod, caper butter Basa filets, and a couple more steaks for good measure.  

A friend asked me the other day if I would be interested in starting up a supper club.  A time for us to share quality food and friendship together.  Have you been listening to anything I've been blogging?  Is your mouth watering at the sight of the juicy cuts of yum above?  Interested in a supper club.... *pfft*  Hell yeah I am!